
Welcome back to your favorite desserts and baking blog:)
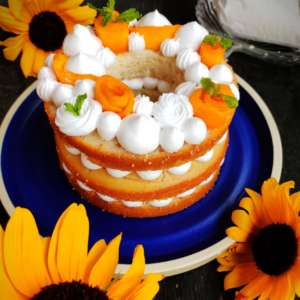
How to make eggless fresh mango cake at home that is stunning to look at and delicious to gorge into? Your search definitely ends here. This blog post is going to teach you how to make the basic eggless vanilla sponge, how to whip the cream perfectly, and to nail the final assembly of the cake. I had so much fun making this cake. It turned out to be exactly as I imagined.
Look at the sunflowers, too; don’t they lighten up the picture! Sunflowers and mango are a happy combination of color and amp up the visual appeal. I was surprised when I got to know that so many of you are looking for eggless recipes to bake on your weekends or whenever you feel like it. I baked the sponge at night because I was in the mood for some baking at that time.
Bake this on your weekend, and do share if it turns out well. I also included a tiny section for basic problems that you might face, so go through it to avoid mistakes.
There are links on this site that can be defined as affiliate links. As an Amazon Associate, I earn from qualifying purchases.
What equipment do I need?
–Set of teaspoons and tablespoons
What ingredients do I need to make fresh mango cake at home?
I am so excited to share the recipe with you. I had no idea that so many people prefer eggless recipes. The basic eggless sponge has got to be one of the most searched for. I can assure you the cake will be super moist and super soft. You will definitely keep trying this recipe over and over. It uses yogurt as an acid to activate the baking soda. Baking powder is also added to help the cake rise. Yogurt is an easily available alternative to the egg. The baking soda forms an ample amount of air bubbles to replicate the light and airy texture of good sponges.
How to make fresh mango cake at home?
Procedure for making the vanilla sponge:
- Line a 5-inch cake tin using butter paper or parchment paper in the base. Grease the rest of the tin using oil.
- Preheat your microwave at 180 degrees Celsius/ 356 degrees Fahrenheit in a convection setting.
- In a separate bowl, sift the flour.
- Now beat the yogurt and sugar till the sugar dissolves completely in another bowl.
- Add baking powder and baking soda and let it sit for five minutes to allow the mixture to bubble up.
- Now add the neutral oil and vanilla essence.
- Beat to mix it well. Add the flour gradually and fold it in the batter using a spatula.
- Make sure you fold in gently only till the time that there are no more lumps.
- Do not overmix. Pour the batter into the cake tin and tap gently to remove any air bubbles.
- Place it in the preheated convection oven at 180 degrees Celsius/ 356 degrees Fahrenheit in a convection setting for 45 minutes.
- Check once after 35 minutes by poking a skewer or a knife. If the knife comes out clean, your sponge cake is done.
- Let it cool for a while before removing it from the cake tin, It should gently slide out.
- Cool it on a rack.
Procedure for whipping the cream:
- Let the frozen cream thaw at room temperature.
- Ideally, a chilled bowl should be used, but a bowl works fine if your cream is still chilled but not frozen.
- Add the cream to the bowl and start beating using an electric beater. You can use a whisk, but it will take quite some time.
- Beat at medium speed till you get stiff peaks.
- You can add vanilla essence to your cream. I prefer adding it for flavor.
- Cover and refrigerate.
Preparation for assembly:
- Mint leaves: Take out sprigs, i.e., the top three leaves at the tip. Place it in a bowl of water and ice cubes. Place it in the refrigerator. This keeps the mint leaves fresh.
- Milk: Use chilled milk when brushing on the cake.
- Mango Roses: Slice up thin slices of mango. Try to get longer and thin slices of mango. Now, roll to make cute roses to place on the cake.
Assembly:
- For assembling the cake, first cut the sponge using a serrated knife or a very sharp knife in case you don’t have one.
- Then, using a cutter of your choice, cut out holes at the center of the sponge. Make sure the edges are well aligned. In case you don’t have a cutter, use a tiny glass to cut the holes.
- Place the first layer on a plate or a cake base.
- Soak the sponge by drizzling some milk on top.
- Now, using an R-4 nozzle, pipe out dollops of whipped cream in two circular lines. Try to pipe out similar sized dollops for making your cake look pretty.
- You can add chopped mangoes or mango puree on top of the whipped cream. I did not add to ensure that my cake looks picture-perfect.
- Place the next layer gently on top of it.
- Repeat the same procedure and place the third layer.
- Using nozzles R-4, R-46, and 5, pipe out beautiful dollops of freshly whipped cream on top after soaking.
- Slice up the mango and make beautiful roses to decorate your mango cake.
- Finally, add a few mint leaves to finish off your cake.
- Let the cake chill in the refrigerator for at least half an hour.
- Time to slice up and enjoy this beauty!
Video Tutorial:
View this post on Instagram
Frequently Asked Questions about fresh mango cake at home.
How to make mangoes look fresh?
Use fresh and good quality mango. Ensure that the mango has no fiber strands, as it may tear up your thin slices. Place mangoes in ice-cold water for some time to firm it up before slicing. Use a sharp knife to cut thin, even slices. Roll the slice to make mango rosettes.
How to make the mint leaves look fresh?
Take out the top mint leaf sprig and place it in ice-cold water. The ice will ensure that the leaf remains fresh and crisp.
How to use this eggless sponge?
You can use this sponge not just to make a mango cake but also to make other fruit cakes. It can also be used to make other flavored cakes. I would love to use this sponge to make a honey and almond-flavored cake. Let your imagination run wild. Baking should be fun, so just enjoy it.
Which nozzles should I use?
I used the following nozzles or piping tips. You can buy it from any local store or online. I am also placing online links to purchase it here.
Fresh Mango cake at home troubleshooting!
Here’s some help you in case you get stuck! These are very common problems, so I will answer them here.
- Sponge not rising: Check the amount of baking powder and baking soda. Also, check the expiry date.
- Sponge has cracks: The oven temperature was too high, ensure that you pre-heat the oven at the stated temperature.
- Cake too dense: Ensure that you let the yogurt and baking powder-soda mix sit for at least five minutes.
- Sponge cake stuck to the cake tin: Ensure that you grease the cake tin well before adding the batter.
- My layers are not straight after cutting: You can trim off the uneven part or use extra cream on the lower side to even it out.
- What to do with the trimmings: Make cake pops or eat it!!
Pro tips to nail fresh mango cake at home:
-
- If the cream is soft and smooth, you will have no problems piping out beautiful dollops of cream. You can use a dairy whipping cream, too. I used non–dairy whipping cream as it is easily available for everyone.
- Cutting the sponge evenly is another crucial aspect of making your cake look pretty. In case you cannot cut even layers of sponge, use toothpicks as markers or use a thread to cut through.
- Soaking the sponge with milk is another crucial step to making this cake soft and moist.
- List of nozzles that I used:
-
- Nozzle no. R-4
- Nozzle no. R-46
- Nozzle no. 5
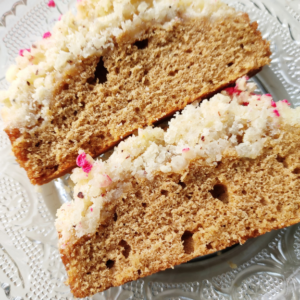
Other bread recipes:
[ CLICK ON THE IMAGE FOR THE RECIPE]


Easy cup to gram convertor guide: Click here
Get my free cookie e-book here: Click here
Fresh mango cake at home
How to make eggless fresh mango cake at home that are stunning to look at and delicious to gorge into? Your search definitely ends here.
Ingredients
- For the basic eggless vanilla sponge:
- Flour- 130 grams
- Sugar- 90 grams
- Yoghurt- 150 grams
- Neutral Oil- 60 ml
- Baking powder- 1/2 tsp
- Baking soda- 1/4 tsp
- Vanilla essence- 1 tsp
- Milk- 2 tbsp
- For the whipped cream:
- Non- dairy whipped cream- 200 ml
- Vanilla Essence- as required
- For the assembly:
- Mango- 1 medium size
- Mint Leaves- 4 sprigs
- Milk- 250 ml
Directions
- Step 1 Procedure for making the vanilla sponge:
- Step 2 Line a 5 inch cake tin using butter paper or parchment paper in the base. Grease the rest of the tin using oil.
- Step 3 Pre-heat your microwave at 180 degrees Celsius/ 356 degrees Fahrenheit in convection setting.
- Step 4 In a separate bowl, sift the flour.
- Step 5 In another bowl, beat the yoghurt and sugar till the sugar dissolves completely.
- Step 6 Add baking powder and baking soda and let it sit for five minutes to allow the mixture to bubble up.
- Step 7 Now add the neutral oil and vanilla essence.
- Step 8 Beat to mix it well. Add the flour gradually and fold it in the batter using a spatula.
- Step 9 Make sure you fold in gently only till the time that there are no more lumps.
- Step 10 Do not overmix. Pour the batter in the cake tin and tap gently to remove any air bubbles.
- Step 11 Place it in the preheated convection oven at 180 degrees Celsius/ 356 degrees Fahrenheit in convection setting for 45 minutes.
- Step 12 Check once after 35 minutes by poking a skewer or a knife. If the knife comes out clean, your sponge cake is done.
- Step 13 Let it cool for a while before taking it out of the cake tin, It should gently slide out.
- Step 14 Let it cool down.
- Step 15 Procedure for whipping the cream:
- Step 16 Let the frozen cream thaw at room temperature.
- Step 17 Ideally, a chilled bowl should be used, but a bowl works fine if your cream is still chilled but not frozen.
- Step 18 Add the cream to the bowl and start beating using an electric beater. You can use a whisk but it will take quite some time.
- Step 19 Beat at medium speed till you get stiff peaks.
- Step 20 You can add vanilla essence to your cream. I prefer adding it for flavor.
- Step 21 Cover and refrigerate.
- Step 22 Preparation for assembly:
- Step 23 Mint leaves: Take out sprigs ,i.e, the top three leaves at the tip. Place it in a bowl of water and ice cubes. Place it in the refrigerator. This keeps the mint leaves fresh.
- Step 24 Milk: Use chilled milk when brushing on the cake.
- Step 25 Mango Roses: Slice up thin slices of mango. Try to get longer and thin slices of mango. Now simply roll to make cute roses to place on cake.
- Step 26 Assembly:
- Step 27 For assembling the cake, first cut the sponge using a serrated knife or a very sharp knife in case you don’t have one.
- Step 28 Then using a cutter of your choice, cut out holes at the center of the sponge. Make sure the edges are well aligned. In case you don’t have a cutter, use a tiny glass to cut the holes.
- Step 29 Place the first layer on a plate or a cake base.
- Step 30 Soak the sponge by drizzling some milk on top.
- Step 31 Now using a R-4 nozzle, pipe out dollops of whipped cream in two circular lines. Try to pipe out similar sized dollops for making your cake look pretty.
- Step 32 You can add chopped mangoes or mango puree on top of the whipped cream. I did not add to ensure that my cake looks picture perfect.
- Step 33 Place the next layer gently on top of it.
- Step 34 Repeat the same procedure and place the third layer.
- Step 35 Using nozzles R-4,R-46 and 5, pipe out beautiful dollops of freshly whipped cream on top after soaking.
- Step 36 Slice up the mango and make beautiful roses to decorate your mango cake.
- Step 37 Finally add few mint leaves to finish off your cake.
- Step 38 Let the cake chill for at least half an hour in the refrigerator.
- Step 39 Time to slice up and enjoy this beauty!

DID YOU MAKE THIS RECIPE?
Tag @alishasdessertsafari on Instagram and hashtag it #alishasdessertsafari
Don’t forget to Subscribe to get new recipes every week because you will love it!
Follow me on social media to get more BTS, baking tips, launches and daily updates.
I hope you found my post “Fresh mango cake at home” helpful. If you have any queries, feel free to post them in the comments below.
Thank You.


What a beautiful cake! I’m baking it this week.
Do let me know how it turns out:D