Welcome back to your favorite baking and dessert blog! The fall season is here, and we all can feel the bite in the air; as we embrace this season, which tells us how beautiful change can be, my recipe today will change your regular bread. The recipe I am talking about today is, you must have guessed by the title, well! It’s the flavorful No Knead Pepperoni Focaccia with Homemade Marinara.
I agree we all have enjoyed our slice of pepperoni pizza, but this Italian version with focaccia is worth a try.
Focaccia is a delicious Italian flatbread with a soft, chewy interior and a savory flavor. Its versatility makes it an excellent choice for various recipes, and its toppings and seasonings can be customized to suit your liking. You can enjoy it on its own or as part of a meal.
This bread is so versatile that it can be served in many ways, it can be used as a sandwich bread or served alongside soups. Plus, the dimples on its surface look cute with your choice of toppings, edible dimples, I must say.
A little about the beauty of no-knead bread
This blog would be pointless if I didn’t explain it briefly. Jim Lahey wrote a book called “My Bread: The Revolutionary No-Work, No-Knead Method.” It talks about a unique way of making bread: you don’t knead the dough to create gluten. Gluten is developed through a long rise time given to the dough. The dough has significantly higher amounts of moisture that naturally results in gluten formation over a long period.
Table of contents:
- Equipment required
- Ingredients required
- Procedure
- Step-by-step picture
- Video Tutorial
- FAQ
- Recommended recipes
- Recipe Card
There are links on this site that can be defined as affiliate links. As an Amazon Associate, I earn from qualifying purchases.
What equipment do I need to make no-knead pepperoni focaccia?
A set of teaspoons and tablespoons
This stainless steel measuring spoon set is perfect. I use the one that my pastry college provided to me. I did use the plastic ones, but let me tell you, they may look boring. But stainless steel is best for long-term and safe use.
Big Bowl
I use big bowl because it reflects the light when I shoot videos, and you also get to see all the ingredients. It can also be used in the microwave.
Chopping board
I bought my chopping board from a fair in Shantiniketan, but I found something similar online.
Chef’s Knife
When I was studying hotel management, my chef said, keep your knife and wife close. Sexist, but you get it. Our knives are precious to us. We sharpen it regularly, clean it, and love it. Our chefs always taught us that we need to love our tools and equipment, and they will work perfectly for us. I agree with that, and my knife has always been super kind to me. I bought this knife seven years ago, and it’s good as new. Here is the knife that I use.
Cake tin
I use this cake tin to bake my cake. I don’t have a big family or a lot of friends and relatives with whom I can share, so I use tiny cake tin.
Electric beater
I have been using my electrical beater for so long that the model doesn’t exist anymore…haha. That is exactly why I would forever recommend that you use this brand’s electrical beater.
Weighing Scale
Not everything good is costly, weighing scale is perfect for all your recipes. I have been using this one for 6 years, and then it broke because I dropped it by mistake. You would think I bought one after that, but no. I decided to use a tape and kept using it for 6 more months until it finally gave up, and I had to buy another one.
Spatula
Trust me when I say you need silicon spatula. It’s the best thing ever! Nothing, I repeat, nothing can clean your bowl the way a spatula cleans it. Also, bonus points, it’s heat resistant, dishwasher safe, and has no cracks and crevices, so it’s easy to clean.
Balloon Whisk
This balloon whisk has a good grip and rounded tip for better whisking. I don’t use this because I already got balloon whisks when I got my toolkit from college, but this one’s a good whisk.
What ingredients do I need to make no-knead pepperoni focaccia?
Yeast
Peeking through the oven when you see that your focaccia is rising is the result of yeast. I have used active dry yeast, which is a dried form of yeast that needs to be hydrated to activate. Yeast feeds on sugar to create alcohol and carbon dioxide. This carbon dioxide is important for your focaccia to rise and for the texture, which is why honey is mixed to provide the yeast with some sugar. Instant yeast is also available in markets that do not need any activation.
I have a whole blog post written separately for yeast, so if you are interested in knowing more, check this link.
Honey
Honey is used to provide sugar to the yeast for feeding.
Flour
I have used all-purpose flour to make this focaccia. Make sure you sieve it to get rid of any impurities. It is the main ingredient for making good bread, and knowing about it is essential.
Olive oil
Focaccia is an Italian bread, and hence, it deserves nothing less than an olive oil. Make sure you buy cooking olive oil for use in baking or cooking. This recipe uses generous drizzles, and I don’t want you to feel shy.
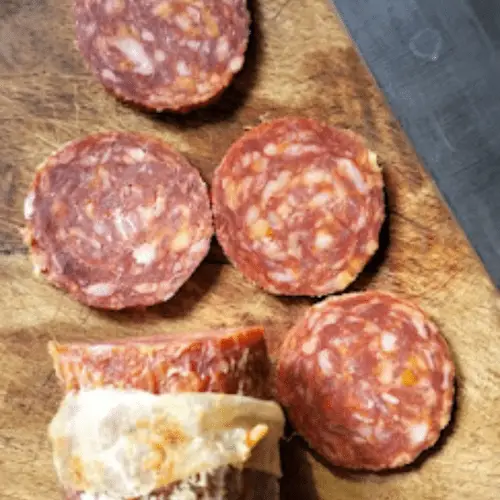
Pepperoni
For the Pepperoni here, I have used smoked paprika chorizo imported from Italy, but you can use any that is easily available nearby. You can put the pepperoni bits on top of the focaccia, or just like I have done in this recipe, for that extra smoky flavor, you can chop it up into bits and add it nicely into your focaccia dough as well. Also, If you are open to trying a different variant of focaccia, I have one to share with you. No knead overnight bread- Garlic Herb Focaccia
Dried herbs
Fresh or Dried, whichever way you prefer.
Salt
Salt is used in this recipe to control the yeast activity and slow down the fermentation process. Omitting salt will lead to an over-proofed bread with a sour taste, so salt slows down the fermentation process and tightens the gluten strands.
Check the recipe card for the quantity.
How to make no-knead pepperoni focaccia?
Activation of yeast
Mix lukewarm water, yeast, and honey and let it activate for 10 minutes. Here, you are waiting for the yeast to feed on the honey, break it down, and produce carbon dioxide and alcohol. When the yeast is activated, you will see bubbles on the mixture. Add the activated yeast and salt to the sifted and measured flour.
Making the dough
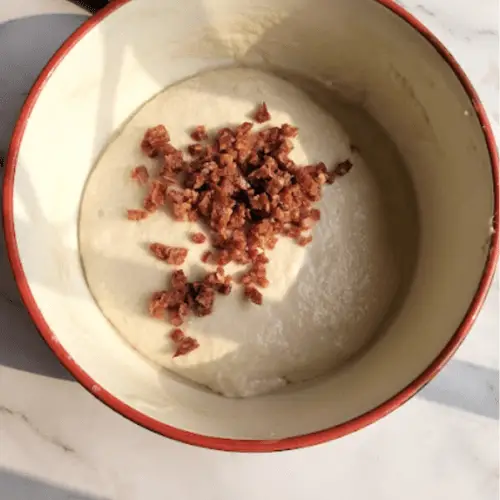
Cut your Pepperoni into small pieces, enough for its flavor to emerge from within the bread as well and not just from the topping.
Thoroughly combine the diced Pepperoni with a spatula to create a loose, no-knead dough. This is one of the great advantages of a no-knead bread—no more messy hands.
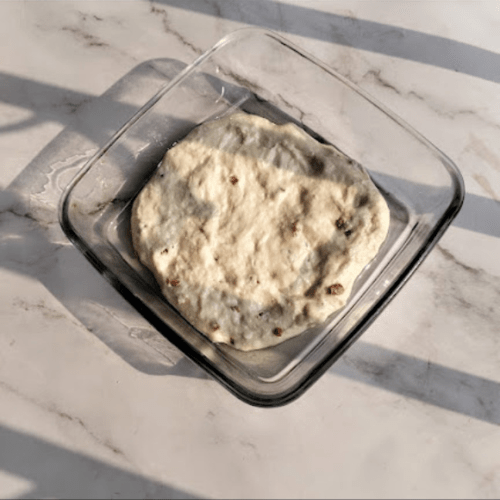
In a bowl, generously drizzle olive oil, then place the dough into it. Cover the bowl with plastic wrap and refrigerate it for a minimum of 8 hours. Avoid using a damp towel to cover it, or you will end up with skin on the dough’s surface.
If this is your first time making this bread, rest assured that I’ve got you covered. You can refer to the pictures or the video for guidance on how the dough should appear.
I kept mine for 12 hours. You can leave it for up to 24 hours.
If you are learning and starting to make bread, you can check out this link for an easy-peasy recipe to make soft and fluffy bread.
Japanese Shokupan (Milk Bread using Tangzhong)
How to make Homemade Marinara sauce?
In a saucepan, heat some olive oil (a dash of Italian flair), add in the chopped garlic, stir for a few seconds, and then add the chopped onion.
Fry them until the onion turns translucent, then add the chopped tomatoes and the pulp and let it cook for some time.
Then add salt, sugar, vinegar, and oregano, and let it cook for 10-15 minutes. Keep stirring in between, and the sauce will reduce, thicken, and intensify flavor.
Add the sliced basil and mix well before you turn off the stove.
Your magical Marinara sauce is ready.
Here, I am making the Marinara sauce specifically for this recipe, however, if you want, you can also make it in more quantity and use it with pasta, pizza, or just as a dip.
Folding
After 12 hours in the fridge, your dough should be ready for some folding, take it out of the bowl and fold it from all four sides. This is when you add chopped pepperoni bits and fold the dough so that we get some meaty surprise in every bite, because why not?! To fold, imagine the dough is square-shaped. Now, take one side of the square, stretch it as much as you can, and then bring the edge on the top of the dough and place it on the top part, but only half of it. Repeat from all sides till you have a nice little pouch. Now, turn it upside down to place all the edges on the bottom. For a better understanding of how to do this, be sure to check the video shared for reference.
Prep for baking
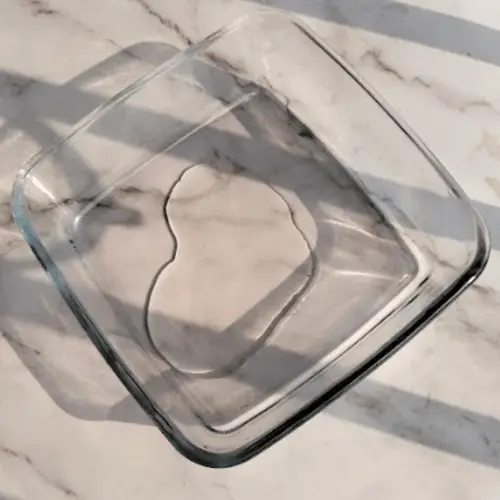
Generously grease your baking dish with olive oil. Spread it out evenly so that it is even on all sides, ensuring the dough won’t stick during baking.
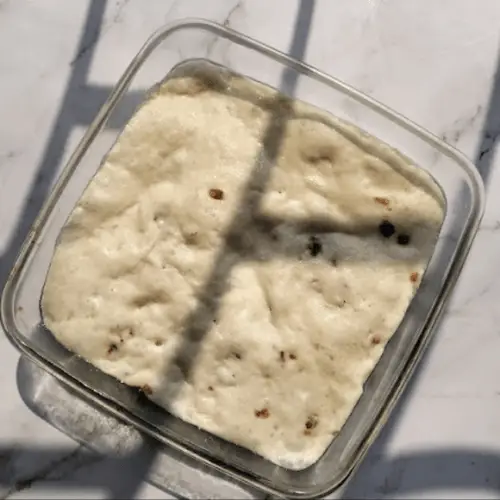
Place the folded dough inside the greased baking dish. Spread it out evenly so that it covers the dish uniformly. Don’t worry if the dough doesn’t reach the edges of the dish at this point. It will naturally expand during the proofing process.
I used a 15.8 x 15.7 x 5.2 cm baking dish, but you can use baking dishes of any shape. Just make sure it has enough space for the bread to double in size.
Now, place the prepared dough in a warm location for proofing. It will take approximately 2 hours for the dough to double in size.
While the dough is proofing, preheat your oven to 200 degrees Celsius (392 degrees Fahrenheit).
In case you’re worried if your bread has been proofed correctly, you can check this link and have a sigh of relief!!! It talks about all the signs to check if the dough has been proofed or not.
In case you feel that you might have accidentally over-proofed your bread, don’t worry. Check out this link where I talk all about how to save over-proofed dough.
But we don’t want to accidentally over-proof your bread, and that’s where this blog comes in handy. I will tell you exactly How to Avoid over-proofing bread.
Baking
Now, generously spread olive oil on the dough. The more, the better, obviously duh!
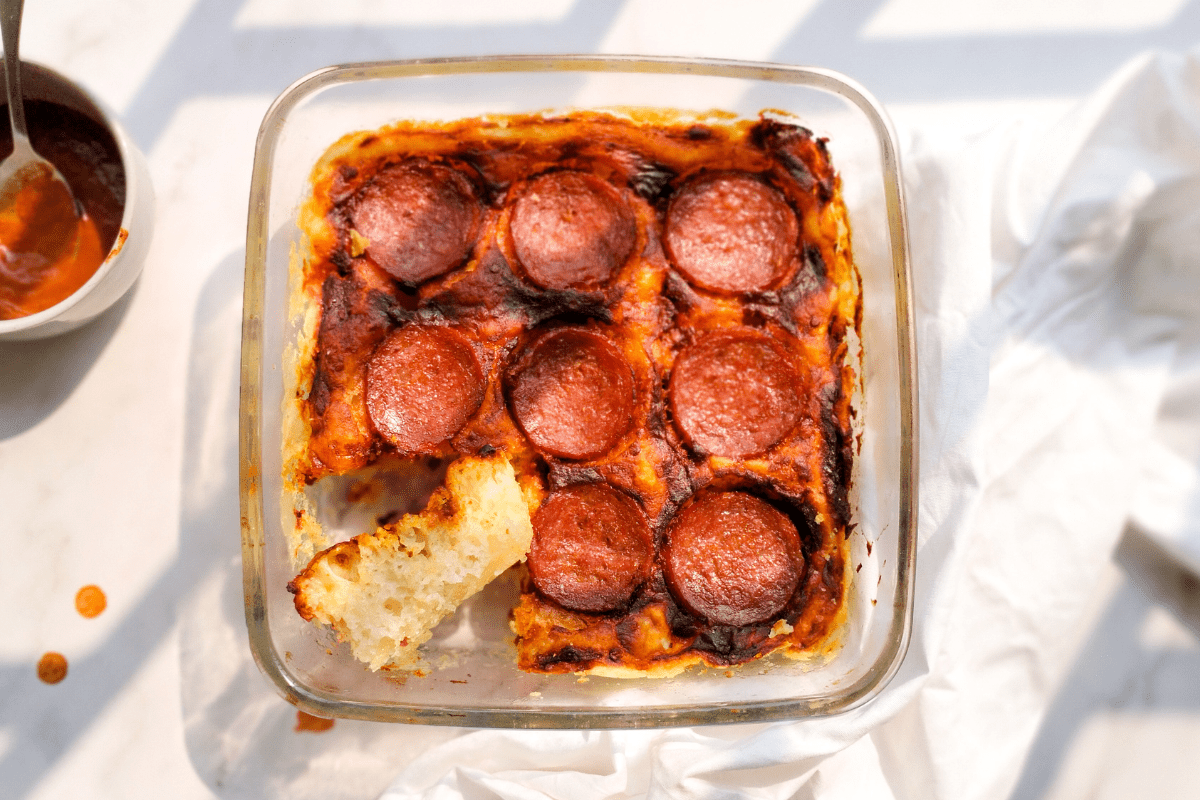
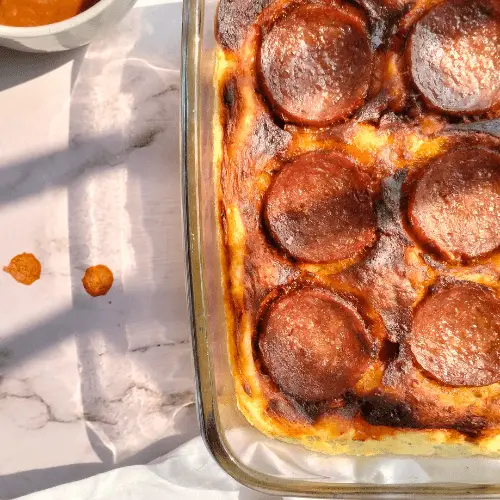
Dock with your fingers gently to release the excess air. Spread the Marinara sauce evenly with the help of a spoon, and place the sliced pepperoni as a topping.
Bake your focaccia at 200 degrees Celsius/392 degrees Fahrenheit for 30 minutes. Every oven is different, so check after 20 minutes.
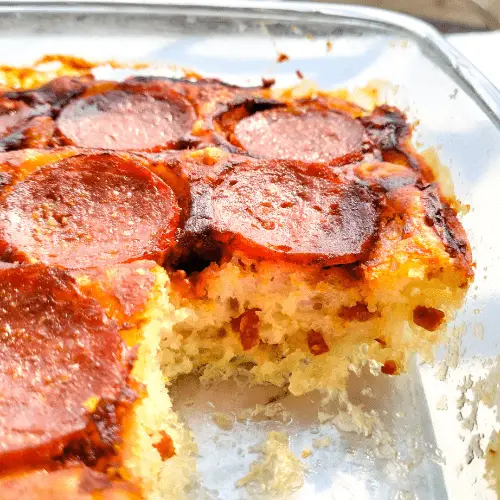
You will know it is done when it is golden brown on top.
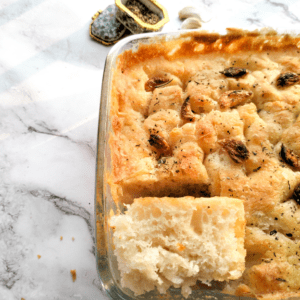
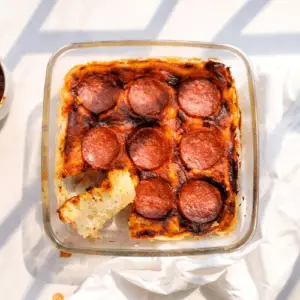
Your smoked paprika pepperoni focaccia is ready to be relished.
Step-by-step pictures on how to make no-knead pepperoni focaccia:


Frequently Asked Questions about Making No-Knead Pepperoni Focaccia with Homemade Marinara:
What toppings can I use?
You can use whatever you love. Common toppings that are used are:
Rosemary, Cherry tomatoes, olives, caramelized onions, basil, pesto.
What is Pepperoni?
Pepperoni is a spicy salami variety crafted from cured pork and beef, seasoned with paprika or chili pepper, for a burst of flavor. It boasts a soft, slightly smoky texture and a vibrant, fiery red hue. In American pizzerias, sliced Pepperoni reigns as one of the most beloved pizza toppings.
How is focaccia bread different from normal bread?
A traditional focaccia will have just rosemary and sea salt, that is, some toppings; however, breads do not require toppings. A focaccia is a soft and bubbly bread with beautifully developed flavors of olive oil and toppings. Normal bread doesn’t use olive oil and has a different flavor profile altogether. While traditional bread goes bad quickly, focaccia does not stale easily because of the generous usage of Olive oil, which is what I asked you to do in the recipe as well.
How to store?
Store it in an airtight container in your refrigerator.
How long will it last?
It will last for 7 days if kept well.
Why is there skin on my dough?
Covering your dough is essential to avoid skin formation. While placing it in the fridge, don’t forget to use a cling wrap to cover it completely.
What to do in case my dough has skin?
Don’t panic; skin formation happens because of the loss of moisture from the dough’s surface. Your only way out is to spray some water on top to rehydrate the dough. This will not give you perfect bread, but saves your bread from being a disaster.
Can I carry this when I am traveling?
Yes, it is travel-friendly. Remember, it will last longer in a cold climate and shorter in a warm climate.
Can I make this with whole wheat flour?
Of course, you can, but not with this recipe. Comment down below if you want a whole wheat focaccia recipe.
More bread recipes for you:
[ CLICK ON THE IMAGE FOR THE RECIPE]
No Knead Pepperoni Focaccia with Homemade Marinara
Discover the Easiest No-Knead Pepperoni Focaccia Recipe with a Delectable Homemade Marinara Sauce Topping! Bake up a Slice of Heaven Today!
Ingredients
- Olive oil: 1tbsp
- Onion: 1 medium
- Tomatoes: 500 gms
- Garlic(chopped): 10-12 cloves
- Salt: a pinch
- Sugar: a pinch
- Vinegar: 1tsp
- Oregano(dried) : 1tsp
- Basil(sliced thinly) : 50 gms
- For the Focaccia:
- Lukewarm water-200 ml
- Active dry Yeast- 2 gm
- Honey- 1/2 tsp
- Flour- 230 grams
- Salt: 4 grams
- Olive oil - 100 ml (greasing included)
- Marinara Sauce: as required
- Sliced Pepperoni : for topping and dough
Directions
- Step 1 Mix lukewarm water, yeast, and honey together and let it activate for 10 minutes. When the yeast is activated, you will see bubbles on the mixture. Add the activated yeast and salt to the sifted and measured flour.
- Step 2 Cut your Pepperoni into small pieces, enough for its flavor to emerge from within the bread as well and not just from the topping.
- Step 3 In a bowl, generously drizzle olive oil, then place the dough into it. Cover the bowl with plastic wrap and refrigerate it for a minimum of 8 hours. Avoid using a damp towel to cover it, or you will end up with skin on the dough’s surface.
- Step 4 To make the marinara sauce, in a saucepan heat some olive oil (a dash of Italian flair), add in the chopped garlic, stir for a few seconds, and then add the chopped onion.
- Step 5 Fry them till the onion turns translucent, then add the chopped tomatoes along with the pulp, and let it cook for some time.
- Step 6 Then add salt, sugar, vinegar, and oregano, and let it cook for 10-15 minutes. Keep stirring in between, and the sauce will reduce thicken, and intensify in flavor.
- Step 7 Add the sliced basil and mix well before you turn off the stove.
- Step 8 Your Marinara sauce is ready. Keep it aside to cool.
- Step 9 After 12 hours in the fridge, your dough should be ready, take it out of the bowl and fold it from all four sides. Chop up some of the pepperoni and thoroughly combine the diced pepperoni while folding. To fold, imagine the dough is square-shaped. Now, take one side of the square, stretch it as much as you can, and then bring the edge on the top of the dough and place it on the top part of the dough but only half of it. Repeat from all sides till you have a nice little pouch. Now turn it upside down to place all the edges on the bottom. For a better understanding of how to do this, be sure to check the video shared for reference.
- Step 10 Generously grease your baking dish with olive oil. Spread it out evenly so that it is even on all sides ensuring the dough won’t stick during baking.
- Step 11 Place the folded dough inside the greased baking dish. Spread it out evenly so that it covers the dish uniformly. Don’t worry if the dough doesn’t reach the edges of the dish at this point. It will naturally expand during the proofing process.
- Step 12 I used a 15.8 x 15.7 x 5.2 cm baking dish for baking, you can use baking dishes of any shape. Just make sure it has enough space for the focaccia to double in size.
- Step 13 Now, place the prepared dough in a warm location for proofing. It will take approximately 2 hours for the dough to double in size.
- Step 14 While the dough is proofing, preheat your oven to 200 degrees Celsius (392 degrees Fahrenheit).
- Step 15 Now generously spread olive oil on the dough. The more the better, obviously duhh!
- Step 16 Dock with your fingers gently to release the excess air. Spread the Marinara sauce with the help of a spoon evenly and place the sliced pepperoni as topping.
- Step 17 Bake your focaccia at 200 degrees Celsius/392 degrees Fahrenheit for 30 minutes. Every oven is different, so check after 20 minutes.
- Step 18 You will know it is done when it is golden brown on top.
- Step 19 Your smoked paprika pepperoni focaccia is ready to be relished.

MADE THIS RECIPE?
Tag @alishasdessertsafari on Instagram and hashtag it #alishasdessertsafari
Don’t forget to Subscribe to get exclusive well-curated value-packed mail twice every month that you wouldn’t want to miss out on!
Follow me on Instagram for more BTS, baking tips, launches, and daily updates.
I hope you found my post “No Knead Pepperoni Focaccia with Homemade Marinara” helpful. If you have any queries, feel free to post them in the comments below.
Thank You.


8 thoughts on “No Knead Pepperoni Focaccia with Homemade Marinara”