Hey there, I am back again with a Kunafa with cream recipe as a festive treat, you can treat your family and friends to this delight during festivities like Diwali and light up their hearts.
Kunafa is a delectable Middle Eastern dessert bound to tickle your taste buds and transport you to a land of rich flavors and timeless traditions, you will high-five me on this one, once you make this recipe.
If I were a genie I would have teleported you and me both to the Middle East to grab a bite of this flavorful and rich dessert.
Picture golden strands of crispy buttery deliciousness embracing a rich creamy filling soaked in syrup and topped with crunchy nuts. If only the mere visualization of Kunafa is enough to set your cravings in motion! Then let me be your dessert genie taking care of your cravings and I will show you exactly how you can make this crispy, aromatic, and mouthwatering Kunafa at home from scratch. So roll out your magic carpet(apron) and let’s embark on this delicious culinary adventure together. Let’s get started!
Table of contents:
- Equipment required
- Ingredients required
- Procedure
- Step-by-step picture
- Video Tutorial
- FAQ
- Recommended recipes
- Recipe Card
There are links on this site that can be defined as affiliate links. As an Amazon Associate, I earn from qualifying purchases.
What equipment do I require to make this Easy Kunafa recipe?
Heavy-bottomed pan: To fry the vermicelli.
A set of teaspoons and tablespoons: This stainless-steel measuring spoon set is perfect. I use the one that my pastry college provided me. I did use the plastic ones but let me tell you, they may look boring but stainless steel is best for long-term and safe use.
Heavy-bottomed saucepan: I have used this saucepan here, as it heats the ingredients evenly and is durable.
Mortar and Pestle: I have used this one here to crush my pistachios. Great for crushing whole spices and nuts.
Cake tin: I use this cake tin to bake my cake. I don’t have a big family or a lot of friends and relatives with whom I can share, so I use this tiny cake tin.
Chopping board: I bought my chopping board from a fair in Shantiniketan but I found something similar online. You can check this one out here. We need this to cut the kunafa nicely and evenly. You can also use it to roughly chop pistachios as well.
Chef’s Knife: When I was studying hotel management, my chef said, keep your knife and wife close. Sexist, but you get it. Our knives are precious to us. We sharpen it regularly, clean it, and love it. Our chefs always taught us, that we need to love our tools and equipment and they will work perfectly for us. I agree with that and my knife always has been super kind to me. I bought this knife seven years ago and it’s good as new. Here is the knife that I use.
Weighing Scale: Not everything good is costly and this weighing scale is perfect for weighing for all your recipes. I have been using this one for 6 years and then it broke because well I dropped it by mistake. You would think, I bought one after that but no. I decided to use a tape and kept using it for 6 more months until it finally gave up and I had to buy another one.
Balloon Whisk: This balloon whisk has a good grip, and rounded tip for better whisking. I don’t use this because I already got balloon whisks when I got my toolkit from college but this one’s a good whisk.
Kitchen Thermometer: Optional to check the temperature of the sugar syrup so it turns out perfect. If you do not have one you can check the consistency in the procedure to make sure your syrup turns out perfect.
What ingredients do I need for this cream kunafa recipe?
For the Vermicelli:
Sewain or Vermicelli
We will use sewain or vermicelli for structuring your kunafa. When fried, vermicelli can provide your kunafa with a delightful crispy texture and a gorgeous golden-brown hue. It’s worth noting that vermicelli is rather neutral in flavor, making them versatile ingredient that can be used in both savory and sweet dishes. If you’re aiming for a visually appealing and tender layering in your kunafa, you might also consider using lachha sewain. Lachha sewain is a variety of Indian vermicelli, typically crafted from wheat flour and available in circular bundles, mainly used in the preparation of Indian desserts like this Seviyan ki Kheer || Seviyan Payasam.
Ghee(Clarified butter)
Ghee or clarified butter is used in this recipe to fry the vermicelli. It also imparts flavor and richness to your kunafa. You can also prepare some at home if you don’t have clarified butter. All you have to do is take a heavy-bottomed pan and start melting your butter. Keep cooking and you will see that the butter has released foam that settles on the top. Use a spoon to skim off the top and whatever you are left with is our clarified butter. I learned this in the very first year of my hotel management and I loved the smell of ghee or clarified butter.
Refined Sugar
I have used the sugar to give sweetness to the dessert as both vermicelli and sewain have no taste or flavor of their own. Now you can play around with the sugar and reduce or increase it by 50 grams.
For the creamy filling:
Milk
I have used full-fat milk here and will use it as a base for your kunafa filling. It gives texture and creaminess to your creamy filling. We Bengalis use milk in a lot of our recipes and Bengali rice kheer recipe with jaggery is one of them. The function of milk is similar in that dish too.
Refined Sugar
Sugar here imparts sweetness to your filling, making it taste delicious. Now you can play around with the sugar here too and reduce or increase it by 50 grams.
Corn starch
Cornstarch serves two purposes in this recipe: it acts as a thickening agent for the creamy filling, preventing it from spilling out of the kunafa, while also providing structural support to hold the filling in place. It also has a neutral flavor so it wont overpower any other ingredient.
Cream Cheese
Cream Cheese is used to enhance the richness of your creamy filling, it also makes your kunafa taste delicious beyond imagination. If you don’t have cream cheese but some full-fat milk, you can still have some kunafa because in this other blog, I tell you how you can make Simple homemade Cream Cheese from scratch.
I would recommend making a lot of homemade cream cheese so you can go ahead and bake this 5-ingredient Biscoff Cheesecake for yourself, I mean, it is too good to miss out on..haha.
For the sugar syrup:
Refined Sugar:
Obviously, we can’t do without a bit more sugar, can we? In this case, sugar is a crucial ingredient for making the sugar syrup, which will be generously drizzled over the kunafa. This syrup not only gives the dessert its sweetness but also imparts a delightful balance of juiciness and crunchiness to the final creation.
Water
This is used to maintain the consistency of the syrup.
Lemon juice
Sugar generally recrystallizes once cooled so here we use a few drops of lemon juice to stop that from occurring.
Rose Water
Optional for flavoring your syrup.
Butter: for greasing
We have used butter here to grease our cake tin so that our kunafa gets a golden color and does not stick to the cake tin.
Detailed procedure to make Easy Kunafa recipe
Prepare the Vermicelli:
Add a generous amount of ghee to a pan over medium heat. Ghee(clarified butter) not only gives flavor but also helps achieve that perfect, golden crunchy texture to your kunafa.
Now add the vermicelli and fry in ghee, add the sugar. Allow the vermicelli to sizzle and turn a beautiful golden brown. Once done, set it aside. The golden vermicelli will be a delicious contrast to the creamy center of your Kunafa.
If you would like to refer to a video while making sure your kunafa gets right from the start, here is one for you:
Create the Sugar Syrup:
In a separate saucepan, pour in sugar and water, then set it over medium heat. This syrup will sweeten our dessert, so make sure to get it just right.
Use a thermometer to monitor the syrup until it reaches around 104°C or 219°F. This will give it the perfect consistency – not too thin, not too thick. Keep in mind that achieving the right syrup consistency is crucial for that authentic kunafa taste. If you don’t have a thermometer, take the sugar syrup and pour it, if the syrup is making two strings, you are good to go.
You can also flavor your sugar syrup with some rose water if you want to give some extra floral flavor to your kunafa.
Prepare the cream filling:
For the creamy, luscious center of your kunafa, take another saucepan and pour in milk, sugar, and cornstarch. The cornstarch will help thicken the mixture beautifully. As you heat this mixture, don’t forget to stir it continuously with a whisk. This ensures a smooth, lump-free cream filling.
Once you see the mixture starting to thicken, it’s time to introduce a secret ingredient – cream cheese! Whisk it in until everything comes together into a rich, luscious filling. Keep cooking until the cream achieves a consistency similar to a ketchup – velvety and thick. This is where the magic happens.
Layering the kunafa:
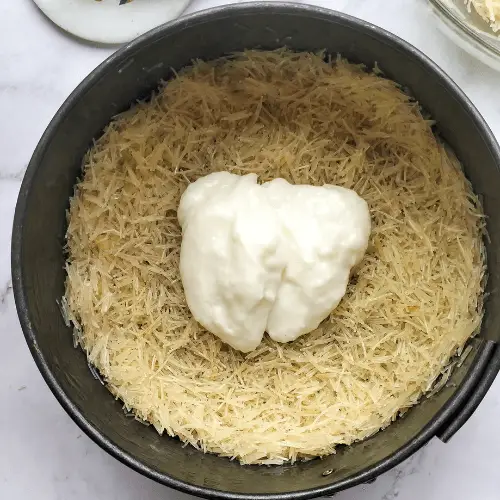
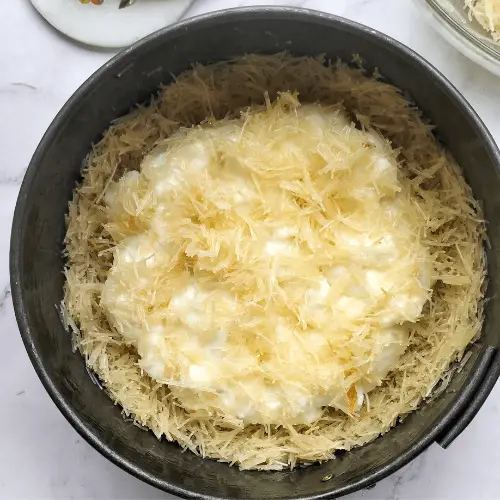
Now it’s time to build your kunafa masterpiece. Grease a cake tin with butter; this will help ensure the kunafa doesn’t stick. Begin by layering half of the golden vermicelli in the tin. Press it down gently with a spatula to create a solid foundation. Next, add the creamy filling, spreading it evenly over the vermicelli layer.
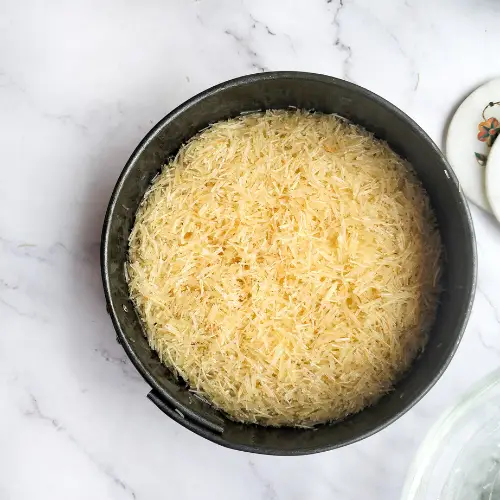
Finally, top it all off with the remaining vermicelli. This will give your kunafa its signature crunchy top layer.
Bake to Perfection:
Preheat your oven to 180°C or 350°F. Once it’s ready, pop your kunafa into the oven for 40 minutes or until it turns a glorious golden brown.
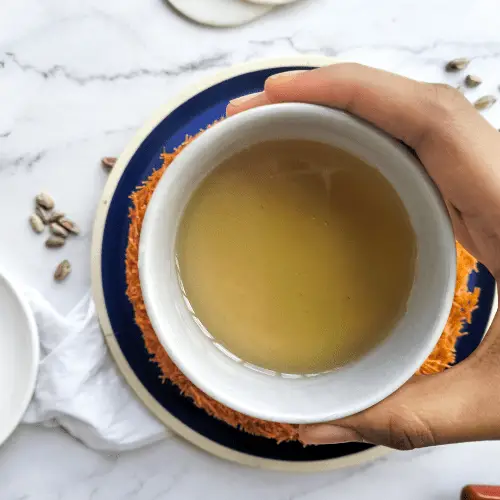
Remove from the oven and, while it’s still warm, drizzle the sugar syrup generously over the top. The syrup will seep into the layers, enhancing your kunafa with just the right amount of sweetness.
The Midas Touch:
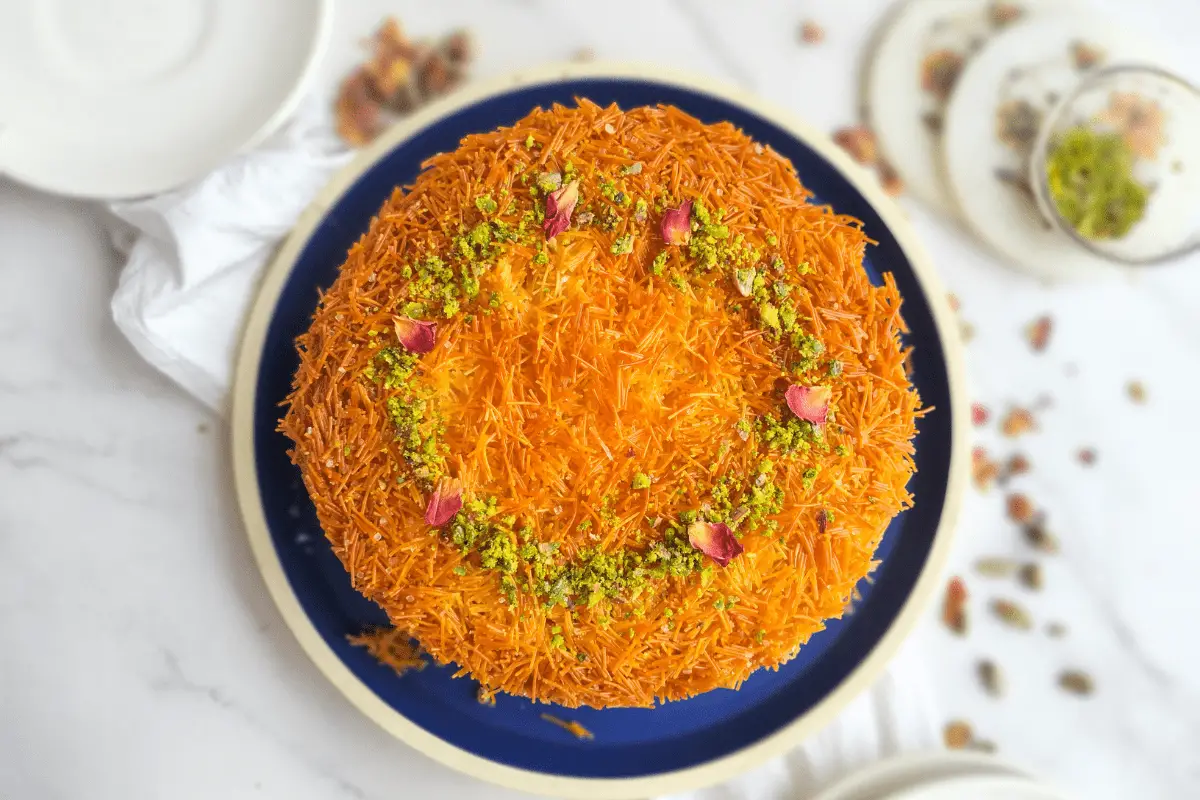
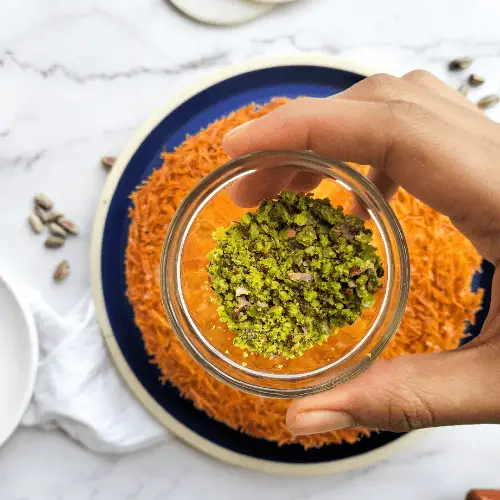
Finally, to add an extra touch of awesomeness and flavor, garnish your kunafa with crushed pistachios and delicate dried rose petals. This will not only make it visually stunning but also add a lovely crunch and floral aroma.
Serve and savor this delightful treat with Middle Eastern vibes to your friends and family and spread the festive joy.
Step-by-step pictures on how to make kunafa with cream recipe:


Frequently Asked Questions about Kunafa with Cream recipe:
How to store?
Store your homemade kunafa in an airtight container in the refrigerator, the cream cheese can go bad if you store it at room temperature for too long. If stored properly in the refrigerator it can last up to 3 days.
Can I freeze kunafa?
You can definitely freeze it but you will need to defrost your kunafa before reheating it. Keep in mind that the texture will alter and not be the same.
How to reheat?
You can either reheat your kunafa in your oven or stovetop. To reheat in the oven preheat your oven to 375/190C and put your kunafa in the oven and bake for 6 minutes. On a stovetop reheat your kunafa uncovered in a pan for about 5 minutes on low flame.
Can it be microwaved?
I would not suggest microwaving because your kunafa tends to become soft and will lose all the crunchy texture and there is no point in enjoying a kunafa that is not crispy.
What can I enjoy my Kunafa with?
I would suggest enjoying your kunafa with a cup of tea without sugar. Kunafa is already sweet so it pairs best with tea.
What other flavor can I use?
I have seen many use orange blossom syrup so you can definitely try that. You can also use your choice of nut toppings as well.
What can I substitute cream cheese with?
You can use clotted cream or mascarpone instead of cream cheese.
Can plant-based milk be used to make kunafa?
I have personally not tried using plant-based milk or have not substituted milk. Whole milk or full-fat milk is ideal for this recipe as milk imparts richness, however, you can go ahead and try it with full-fat coconut milk. Keep in mind that the flavor of coconut will be quite strong.
More milk-based desserts for you to try:
Rasmalai Cake | Eggless Tres Leches cake
How to make Gajar ka Halwa | Carrot Halwa with condensed milk
Bengali mishti doi recipe | sweet yoghurt or curd recipe
More crowd pleaser recipes:
No Knead Pepperoni Focaccia with Homemade Marinara
Easy homemade granola cereal
Cardamom Streusel Coffee Cake Recipe
Kunafa with cream recipe
Your wish for a dessert just came true- Indulge in our heavenly Kunafa with Cream recipe - a delectable dessert experience like no other.

Ingredients
- For the vermicelli:
- Sewain or Vermicelli: 250 grams
- Clarified butter or Ghee: 3 tbsp
- Refined Sugar: 2 tbsp
- For the creamy filling:
- Milk: 350 ml
- Refined Sugar: 20 grams
- Corn starch: 20 grams
- Cream Cheese: 70 grams
- For the sugar syrup:
- Refined Sugar: 200 grams
- Water: 200 ml
- Lemon juice: 1 tbsp
- Butter: for greasing
Directions
- Step 1 Add ghee to a pan and lightly fry the vermicelli with the sugar.Keep it aside.
- Step 2 In a separate saucepan, pour in sugar and water, then set it over medium heat. This syrup will sweeten our dessert, so make sure to get it just right.
- Step 3 Use a thermometer to monitor the syrup until it reaches around 104°C or 219°F. This will give it the perfect consistency – not too thin, not too thick. Keep in mind that achieving the right syrup consistency is crucial for that authentic kunafa taste. If you don’t have a thermometer, take the sugar syrup and pour it, if the syrup is making two strings, you are good to go.
- Step 4 You can also flavor your sugar syrup with some rose water if you want to give some extra floral flavor to your kunafa.
- Step 5 For the creamy center of your kunafa, take another saucepan and pour in milk, sugar, and cornstarch. The cornstarch will help thicken the mixture beautifully. As you heat this mixture, don’t forget to stir it continuously with a whisk. This ensures a smooth, lump-free cream filling.
- Step 6 Once you see the mixture starting to thicken, add the cream cheese. Whisk it in until everything comes together into a rich, luscious filling. Keep cooking until the cream achieves a consistency like that of ketchup – velvety and thick.
- Step 7
- Step 8 Now it’s time to build your kunafa masterpiece. Grease a cake tin with butter
- Step 9 this will help ensure the kunafa doesn’t stick. Begin by layering half of the golden vermicelli in the tin. Press it down gently with a spatula to create a solid foundation. Next, add the creamy filling, spreading it evenly over the vermicelli layer.
- Step 10 Finally, top it all off with the remaining vermicelli. This will give your kunafa its signature crunchy top layer.
- Step 11 Preheat your oven to 180°C or 350°F. Once it’s ready, pop your kunafa into the oven for 40 minutes or until it turns a glorious golden brown.
- Step 12 Remove from the oven and, while it’s still warm, drizzle the sugar syrup generously over the top. The syrup will seep into the layers, enhancing your kunafa with just the right amount of sweetness.
- Step 13 Finally, garnish your kunafa with crushed pistachios and delicate dried rose petals. This will not only make it visually stunning but also add a lovely crunch and floral aroma.
- Step 14 Serve and savor this delightful treat with Middle Eastern vibes to your friends and family and spread the festive joy.

MADE THIS RECIPE?
Tag @alishasdessertsafari on Instagram and hashtag it #alishasdessertsafari
Don’t forget to Subscribe to get exclusive well-curated value-packed mail twice every month that you wouldn’t want to miss out on!
Follow me on Instagram for more BTS, baking tips, launches, and daily updates.
I hope you found my post “Kunafa with cream recipe” helpful. If you have any queries, feel free to post them in the comments below.
Thank You.


This looks beautiful!