A warm welcome to your favorite baking and dessert blog, where we elevate every day into an unforgettable experience! This Vermicelli kunafa recipe is the perfect treat to ring in the festive cheer of Eid.
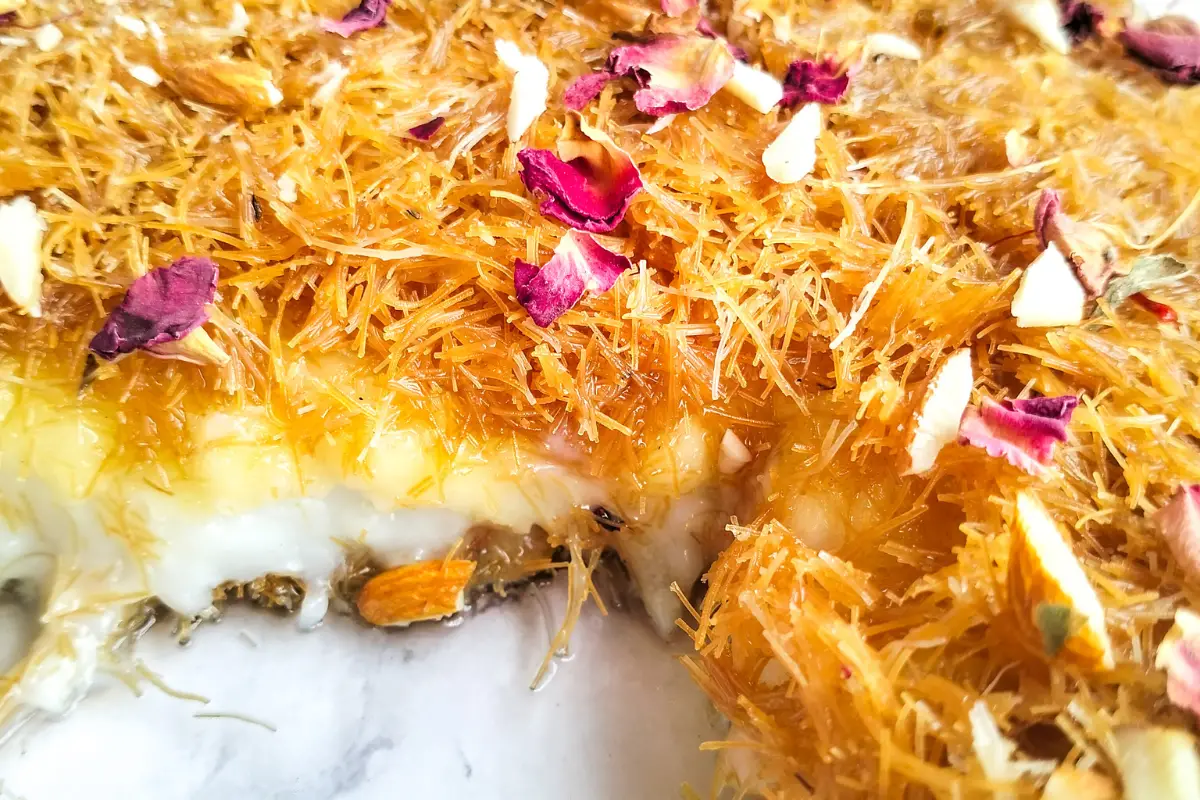
Kunafa a much-adored Middle Eastern dessert, also known by various other names such as Kanafeh, knafeh, and many others across various regions and cultures is basically a delightful amalgamation of sweet syrup, crispy phyllo pastry with different cream fillings, and a garnish of crushed nuts and flower petals
This kunafa recipe ticks all the right boxes amidst the Eid celebrations where there is the warmth of shared moments among families and friends and simple traditions are cherished. The aroma of freshly baked kunafa in a household signals that the time has come for a classic Middle Eastern dessert to be enjoyed with loved ones.
Join me today as I delve into the art of making this classic masterpiece which is my attempt to make sure, your Eid celebrations come alive with its unique flavors and textures.
Table of contents:
- Equipment required
- Ingredients required
- Procedure
- Step-by-step picture
- Video Tutorial
- FAQ
- Recommended recipes
- Recipe Card
There are links on this site that can be defined as affiliate links. As an Amazon Associate, I earn from qualifying purchases.
What equipment do I require to make this Knafeh with cheese recipe?
Heavy-bottomed pan:
To fry the vermicelli.
A set of teaspoons and tablespoons:
This stainless-steel measuring spoon set is perfect. I use the one that my pastry college provided me. I did use the plastic ones but let me tell you, they may look boring but stainless steel is best for long-term and safe use.
Heavy-bottomed saucepan:
I have used this saucepan here, as it heats the ingredients evenly and is durable.
Mortar and Pestle:
I have used this one here to crush almonds. Great for crushing whole spices and nuts.
Chopping board:
I bought my chopping board from a fair in Shantiniketan but I found something similar online. You can check this one out here. We need this to cut the kunafa nicely and evenly. You can also use it to roughly chop pistachios as well.
Chef’s Knife:
I have been using my knife for over 6 years now, so get a good Cartini knife and it’s going to be your new bestie!
Weighing Scale:
Weighing scales are a must-have and if you still don’t have it, I want you to pause reading this, order one online real quick, and come back and finish reading. I’m waiting:)
Balloon Whisk:
This balloon whisk has a good grip, and rounded tip for better whisking. I don’t use this because I already got balloon whisks when I got my toolkit from college but this one’s a good whisk.
Kitchen Thermometer:
Optional to check the temperature of the sugar syrup so it turns out perfect. If you do not have one you can check the consistency in the procedure to make sure your syrup turns out perfect.
Glass Dish:
To assemble our Vermicelli kunafa. I use a Borosil 500 ml capacity oven safe baking dish.
What ingredients do I need to make a Vermicelli kunafa recipe?
For Vermicelli/ Base Preparation
Vermicelli
I’ve used the laccha vermicelli for this recipe, where the vermicelli is stretched out and thinner so the texture is different. Try to get your hands on this vermicelli which is best for kunafa, if you get the thicker one then the texture will not be the same. I always prefer thinner vermicelli because it enhances the texture of the kunafa. I’ve got the fried vermicelli here in case you do not get fried vermicelli, I have mentioned steps below in the procedure, on how you can fry them.
Ghee or clarified butter (salted or unsalted)
I’m not going to tell you to spend a bomb amount on good quality ghee, but it’s so worth it 😭 I’m sorry, the aroma just hits differently when you use superior quality ghee. If you are vegan, you can use plant-based butter for this step.
For the Creamy filling:
Full fat Milk
Full-fat milk has more fat components, resulting in a richer texture and better flavor for our Kunafa. It helps make the cream smooth and creamier with every bite. If you use any other variety of milk the texture will differ. You can also go ahead and choose plant-based milk here.
Mozzarella Cheese
I’ve used mozzarella cheese because it does not have overpowering flavor. It is very subtle and hence goes very well with the Kunafa.
My previous kunafa recipe uses cream cheese and in this one, I’ve used mozzarella cheese. If you are not sure where to get cream cheese and want to make one from scratch then this blog here will be all you need. And do not worry if after making some cream cheese you have some left, because then you can make yummy recipes like these 😉 [excuse some shameless self-promo but the biscoff cheesecake is da 💣💣]
5-ingredient Biscoff Cheesecake
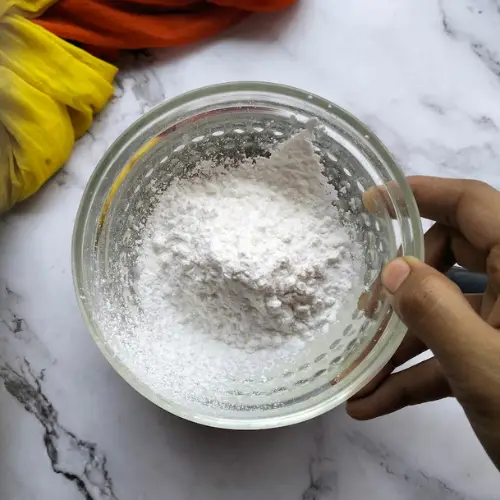
Cornstarch
The starch cells in the cornstarch absorb the moisture from the milk, swell up, and become more of a gel consistency. This helps in thickening the creamy filling so that it is of the perfect consistency to hold shape inside our kunafa.
Grain Sugar
Vanilla Essence
For Sugar Syrup:
Sugar
Sugar added in the sugar syrup provides kunafa with just the right amount of sweetness, balancing out the cream and cheese flavors. It also helps moisten the kunafa ensuring that the right texture is maintained.
Lemon Juice
Lemon juice balances out the flavors of the kunafa and due to the acidic characteristics of lemon juice, the sugar in the syrup does not recrystallize.
Water
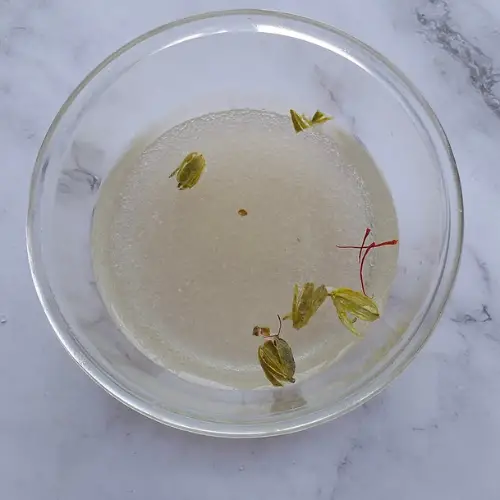
Cardamom pods
Saffron strands
Rose Water
Butter
Crushed Almonds
Rose Petals
Step-by-step pictures on how to make a Vermicelli kunafa recipe?
Step-by-step procedure to make Vermicelli kunafa recipe
Preparing the vermicelli
Note: You need to follow this step only if the vermicelli you’ve got is not fried.
This kunafa recipe that I made before did use raw vermicelli, however this time I was lucky enough to find fried vermicelli which is perfect for this recipe, plus it saves me time.
Just follow the below steps if you have raw vermicelli and not fried.
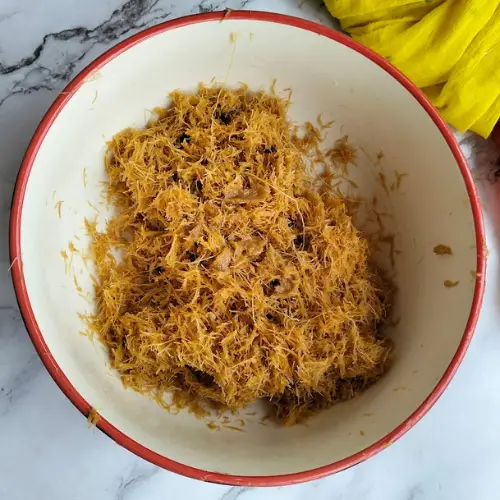
In a pan, take 3 tablespoons of ghee(clarified butter) and add 2 tablespoons of sugar to this add 350 gms of vermicelli and fry it lightly. Once it turns golden brown remove it from the pan and keep aside. Ghee helps to give your kunafa a rich flavor and golden crunchy texture.
Making the fragrant sugar syrup
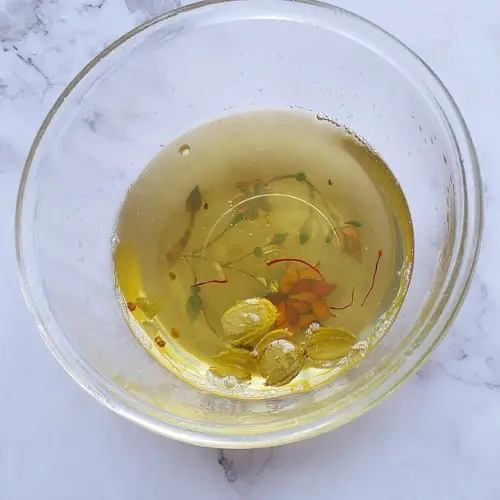
Take another saucepan add water and sugar and heat it, also add 4 cardamom pods and a few saffron strands to make the syrup more fragrant and flavorful, which will make your kunafa taste nothing less than a yummy delight.
To check if the syrup has reached the consistency required for the kunafa make use of a thermometer and check if the temperature has reached 104°C or 219°F or not. If it shows this temperature of 104°C or 219°F it means that the syrup is ready, if lower than this then we need to wait more.
There is another method to check if the syrup is done which doesn’t even need a thermometer. Take the sugar syrup in a spoon and pour it back into the pan, if it forms strings when you pour it back then the syrup is ready and is at the right temperature.
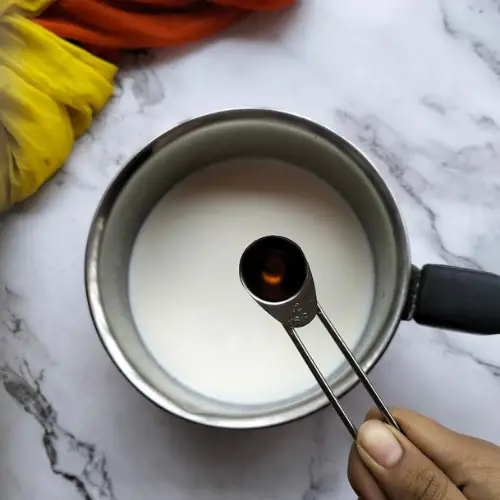
Once you have turned off the heat add a few drops of lemon juice and rose water to the syrup and mix well. The acidic nature of lemon juice ensures that the syrup does not recrystallize.
Prepping the Cream Filling
To ensure that your kunafa has a yummy creamy center, we must get this step right.
In a bowl take some milk, add cornstarch, and whisk well to avoid any lump formation. Keep this slurry aside to be used later.
In a separate saucepan heat the remaining milk with sugar and gradually add the cornflour slurry once the milk is a bit warm and whisk again to avoid lumps. Add a few drops of Vanilla essence and whisk again.
The milk mix should start to thicken and start to feel like having a pastry cream consistency. Ensure the consistency of the cream is thick enough to hold shape and not flow out of the kunafa. Once this cream filling is ready keep it aside.
Building your mozzarella kunafa
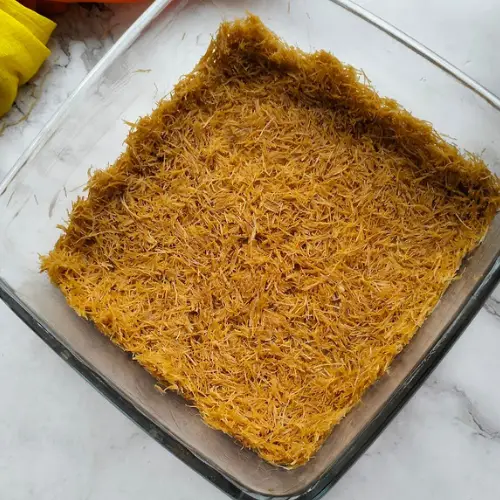
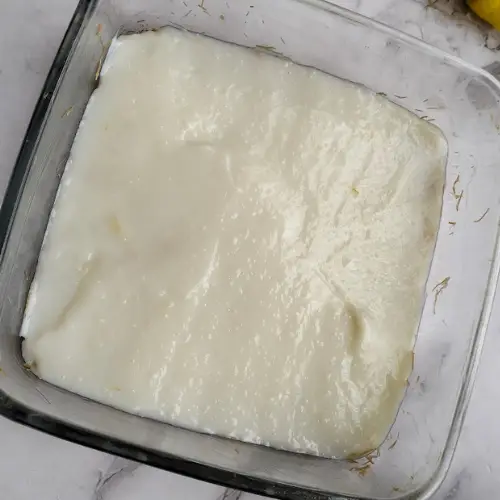
In this recipe, I’ve used a glass dish to layer my kunafa just so that I can admire the layers of this delightful masterpiece.
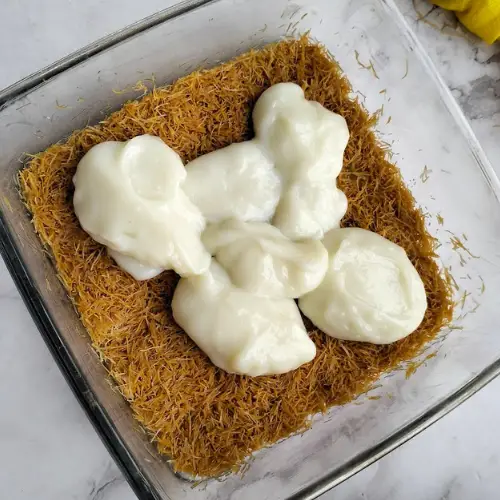
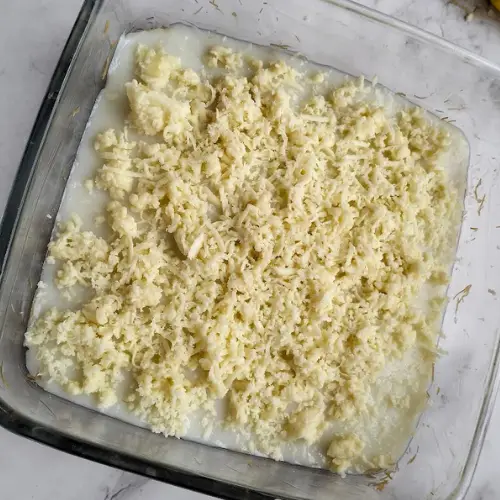
First grease the glass dish with butter and then layer just the bottom part with the vermicelli layer, then on top, layer the prepared cream filling. Then add the star ingredient of this dish on top which is grated mozzarella cheese which gives this classic dish its uniqueness.
Add the mozzarella cheese all over the cream filling and, top it with another layer of vermicelli on top and press it gently with a spatula to ensure that you have a nice crunchy and even layer once the Kunafa is baked.
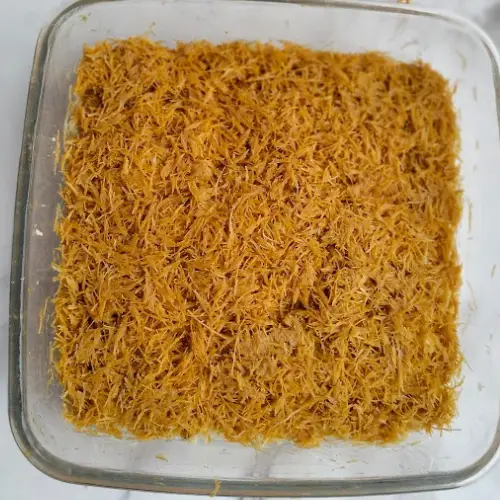
Baking the kunafa:
Preheat the oven to 180°C or 350°F, once the oven is ready put your Kunafa in the oven for 30 to 40 minutes or wait until the top turns golden brown. It is important to note that my oven may be different from yours so please make sure to check the oven settings as the time may vary.
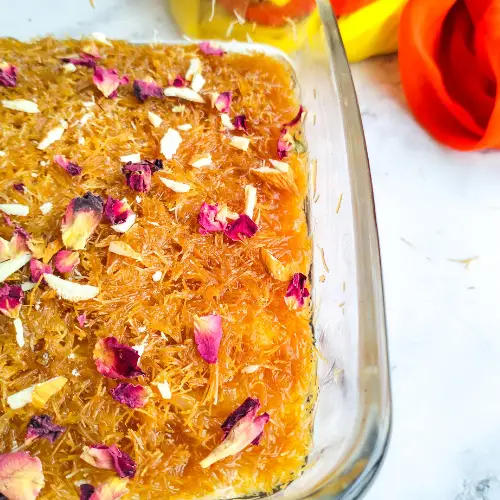
Once your perfect golden kunafa is ready remove it from the oven and generously drizzle the flavorful and fragrant sugar syrup which will seep through the layers and give your kunafa just the right amount of sweetness.
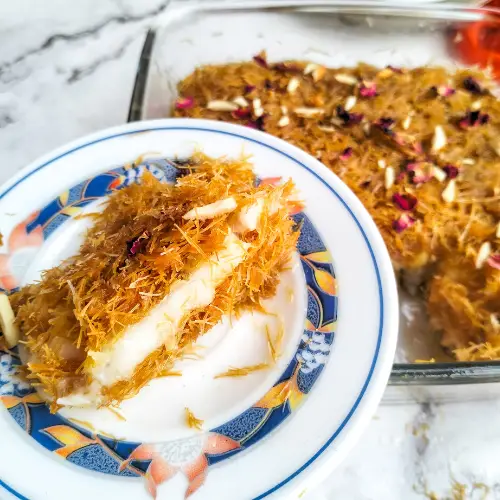
Garnish with crushed almonds and some rose petals to make it look more festive. Pistachios also help as a great garnish however I couldn’t get my hands on pistachios so I used almonds instead.
There you’ve your golden Middle Eastern dessert ready to be enjoyed while bringing in the festive cheer.
Frequently Asked Questions about Vermicelli Kunafa Recipe:
What type of milk should I use for the cream, and can I use a non-dairy alternative?
You can go ahead and use toned milk or skimmed milk, however, the best would be full-fat cream milk as it helps provide a richer taste and texture. You can also use non-dairy alternatives, however the flavors might get affected.
Why is cornstarch used in the cream, and what is the purpose of making a slurry?
Cornstarch is used to thicken the cream. The starch absorbs the moisture from the milk and makes it of gel-like consistency. If we add the cornstarch directly to the milk, there are more chances for lumps to form which we need to avoid. Slurry helps us dissolve the cornstarch in a smaller quantity and then when we add it to milk it gets distributed well.
Can I use a different type of cheese instead of mozzarella for the cream, and how does it affect the flavor?
You can use cream cheese instead of Mozzarella, and here is a kunafa recipe that uses cream cheese instead. Mozzarella is preferred because of its subtle taste which does not cover
What is the purpose of vanilla essence in the cream, and can I omit it if I don’t have any on hand?
I’ve used it as a flavor enhancer and you can skip it if you don’t have one on hand. In place of vanilla essence, you can try using cinnamon powder or orange essence which will impart a delightful flavor to your kunafa.
What is the purpose of the sugar syrup, and how does it contribute to the overall taste of the rolls?
The Cream filling and the vermicelli both have very minimal amount of sugar which is why sugar syrup is added to create a balanced sweetness in the kunafa.
Why are cardamom pods used in the syrup, and can I use ground cardamom instead?
It has been used to enhance the syrup’s flavor along with saffron strands and rose water. It is easier to strain the pods and remove them from the syrup which is why I’ve used cardamom pods.
What role does lemon juice play in the syrup, and can I substitute it with something else?
Sugar syrup without the presence of any acidic element tends to recrystallize and the lemon juice here helps prevent that and keep the syrup in its liquid form.
Why is rose water added to the syrup, and can I omit it if I don’t like the flavor?
I’ve used rose water as an additional flavor, but you can omit it if you don’t like the flavor of it.
Can I make the cream and sugar syrup ahead of time and store them in the refrigerator?
Both the cream filling and the sugar syrup can be made ahead of time and stored, this will save you time when making the final dish when you’ve guests at home.
Do I need to let the syrup cool before using it, or can I use it while it’s still warm?
Use the syrup preferably warm, or at room temperature. The Kunafa once baked will be hot or warm so if the syrup is at room temperature that will also be great but it should never be cold as it will not get absorbed well into the layers of kunafa.
Can I add any additional toppings or ingredients to the kunafa for extra flavor and texture?
Yes please go ahead and add your choice of toppings, I have used crushed almonds however you can add pistachios and rose petals or your choice of nuts as toppings.
More Eid treats for you to try:
Rasmalai Cake | Eggless Tres Leches cake
Seviyan ki Kheer || Seviyan Payasam
Bengali rice kheer recipe with jaggery
and since summer is on here are a few chill recipes you can try to beat the heat:
Iced chocolate recipe easy
Thandai recipe
Fresh mango cake at home
Vermicelli kunafa recipe
Vermicelli kunafa recipe using mozzarella cheese is the perfect crowd-pleaser for any occasion. Bake it now!

Ingredients
- For Vermicelli/ Base Preparation
- 350 Gms Vermicelli
- 100 ml ghee (salted or unsalted)
- For Cream
- 250 ml full fat Milk
- 20 gms grain Sugar
- 35 gms Cornstarch
- 1/4 Tsp Vanilla Essence
- 80 grams mozzarella Cheese
- make slurry for cornstarch
- For Sugar Syrup
- 125ml Water
- 100 gms Sugar
- 4 cardamom pods
- 1 tsp Lemon Juice
- 1 tsp Rose Water
- Butter: for greasing
- crushed almonds for Garnish
- rose petal for garnish
Directions
- Step 1 This kunafa recipe that I made before did use raw vermicelli, however this time I was lucky enough to find fried vermicelli which is perfect for this recipe, plus it saves me time.
- Step 2 Just follow the below steps if you have raw vermicelli and not fried.
- Step 3 In a pan, take 3 tablespoons of ghee(clarified butter) and add 2 tablespoons of sugar to this add 250 gms of vermicelli and fry it lightly. Once it turns golden brown remove it from the pan and keep aside. Ghee helps to give your kunafa a rich flavor and golden crunchy texture.
- Step 4 Take another saucepan add water and sugar and heat it, also add 4 cardamom pods and a few saffron strands to make the syrup more fragrant and flavorful, which will make your kunafa taste nothing less than a yummy delight.
- Step 5 To check if the syrup has reached the consistency required for the kunafa make use of a thermometer and check if the temperature has reached 104°C or 219°F or not. If it shows this temperature of 104°C or 219°F it means that the syrup is ready, if lower than this then we need to wait more.
- Step 6 There is another method to check if the syrup is done which doesn’t even need a thermometer. Take the sugar syrup in a spoon and pour it back into the pan, if it forms strings when you pour it back then the syrup is ready and is at the right temperature.
- Step 7 Once you have turned off the heat add a few drops of lemon juice to the syrup and mix well, this ensures that the syrup does not recrystallize. Add the rose water as well.
- Step 8 Now for the creamy filling. In a bowl take some milk, add cornstarch, and whisk well to avoid any lump formation. Keep this slurry aside to be used later.
- Step 9 In a separate saucepan heat the remaining milk with sugar and gradually add the cornflour slurry once the milk is a bit warm and whisk again to avoid lumps. Add the Vanilla essence and whisk again.
- Step 10 The milk mix should start to thicken and start to feel like having a pastry cream consistency. Ensure the consistency of the cream is thick enough to hold shape and not flow out of the kunafa. Once this cream filling is ready keep it aside.
- Step 11 In this recipe, I’ve used a glass baking dish to layer my kunafa because I love using this one.
- Step 12 First grease the glass dish with butter and then layer just the bottom part with the vermicelli layer, then on top, layer the prepared cream filling. Then add the star ingredient of this dish on top which is grated mozzarella cheese which gives this classic dish its uniqueness. Add the mozzarella cheese all over the cream filling and, top it with another layer of vermicelli on top and press it gently with a spatula to ensure that you have a nice crunchy and even layer once the Kunafa is baked.
- Step 13 Preheat the oven to 180°C or 350°F, once the oven is ready put your Kunafa in the oven for 30 minutes or wait until the top turns golden brown. It is important to note that my oven may be different from yours so please make sure to check the oven settings as the time may vary.
- Step 14 Once your perfect golden kunafa is ready remove it from the oven and generously drizzle the flavorful and fragrant sugar syrup which will seep through the layers and give your kunafa just the right amount of sweetness.
- Step 15 Garnish with crushed almonds and some rose petals to make it look more festive. Pistachios also help as a great garnish however I couldn’t get my hands on pistachios so I used almonds instead.
- Step 16 There you’ve your golden Middle Eastern dessert ready to be enjoyed while bringing in the festive cheer!

MADE THIS RECIPE?
Tag @alishasdessertsafari on Instagram and hashtag it #alishasdessertsafari
Don’t forget to Subscribe to get new recipes every week because you will love them!
Follow me on social media to get more BTS, baking tips, launches, and daily updates.
I hope you found my post “Vermicelli kunafa recipe” helpful. If you have any queries, feel free to post them in the comments below.
Thank You.


1 thought on “Vermicelli kunafa recipe”